Encountering a black screen on a MacBook can be alarming. Especially if you still hear the computer running. The most common causes include screen settings, software issues, and hardware failure on the MacBook’s display assembly or logic board.
Fortunately, users can often fix a MacBook black screen quickly and resume using their laptop.
Secure Data Recovery, an Apple Authorized Service Provider with certified Mac technicians, outlines potential solutions to MacBook black screens. The solutions range from simple DIY fixes to Mac data recovery in extreme cases where your files are essential.
What You Need To Know:
- Most issues causing black screens on MacBooks are software-related and fixable in minutes.
- If a hardware failure caused the black screen, attempting repairs puts the stored data at risk.
- Skilled professionals are the best chance to recover data from a MacBook if losing files is not an option.
- Apple does not back up your device before repairs or offer data recovery services.
Why Is My MacBook Screen Black?
Black screens can happen to MacBooks for several reasons. Culprits include display settings, software conflicts, and physical damage to critical hardware, such as the Retina panel or logic board.
Here are the most likely causes for a MacBook black screen:
- Cracks in the screen
- Sleep mode or display timeout
- Failed macOS update
- Corrupted system files
- Recently installed software
- SMC or NVRAM settings
- Faulty external display driver
- Overheating that triggers an automatic shutdown
- Damaged or defective cables and electronic components
Each issue requires a different approach, but many are easily fixable.
How To Fix MacBook Black Screen
This step-by-step guide outlines the best troubleshooting methods for MacBook black screens, ordered by ease and effectiveness.
Editor’s Note: Data loss is possible when troubleshooting black screens on a MacBook. Assess the value of your files if you do not have a Time Machine backup on an external drive. You can request help to receive a free consultation from our SSD and hard drive recovery experts before proceeding.
1. Adjust Brightness in Case Screen Is Dimmed
Hitting F2 will increase the brightness on most MacBooks. You might have to press the key a few times to notice a difference in the display. Try the same brightness shortcut if you are using an external keyboard.
A dimmed display is an overlooked cause of a MacBook black screen, and ruling it out takes less than five seconds.
2. Force Restart the MacBook
A force restart clears memory and transient glitches that may affect the system. Typically, force restarts will not impact stored data, but you might lose progress on unsaved files in opened apps.
To force restart most MacBooks:
- Press and hold the power button in the top-right corner of the keyboard for roughly 10 seconds.
- Wait 15 to 30 seconds.
- Press the power button again to turn on the MacBook.
To force restart a MacBook Pro with a Touch Bar:
- Press and hold Control + Command + Power together for roughly 10 seconds.
- Wait 15 to 30 seconds.
- Press the power button again to turn on the MacBook Pro.
Sometimes, the black screen is caused by a stalled boot process or unresponsive software. A force restart will often restore the display in these instances.
3. Try External Monitor
If possible, connect the MacBook to an external monitor to see if it detects a display.
Ensure that all cables are firmly seated and the selected input source is correct. Restart your MacBook to force detection if necessary.
A failed handshake with the external monitor suggests a deeper glitch or issue with the MacBook.
4. Disconnect All External Devices
An external device can interfere with a MacBook’s communication and outputs. The interference is even more problematic when the devices confuse the system about where to send the display signal. This occurs with connected monitors and USB hubs in particular.
Disconnect all external devices from the MacBook and restart the laptop to see if the display returns.
If it does, reconnect each device one at a time to isolate the issue, then resolve the specific conflict.
5. Reset NVRAM
Editor’s Note: Resetting NVRAM only applies to MacBooks with Intel processors. Apple released Intel-based MacBooks from 2006 to 2021. People who have MacBooks with Apple silicon can skip this step because M-series chips manage NVRAM.
NVRAM stands for non-volatile random-access memory. In short, it means Intel-based MacBooks have a small amount of memory that retains data without a power source.
These MacBooks use NVRAM to store low-level system settings, such as screen resolution or brightness, across reboots. Variable settings can become corrupt or stale over time due to interrupted write cycles or firmware bugs.
Therefore, resetting NVRAM to its default settings could fix display issues that lead to a black screen.
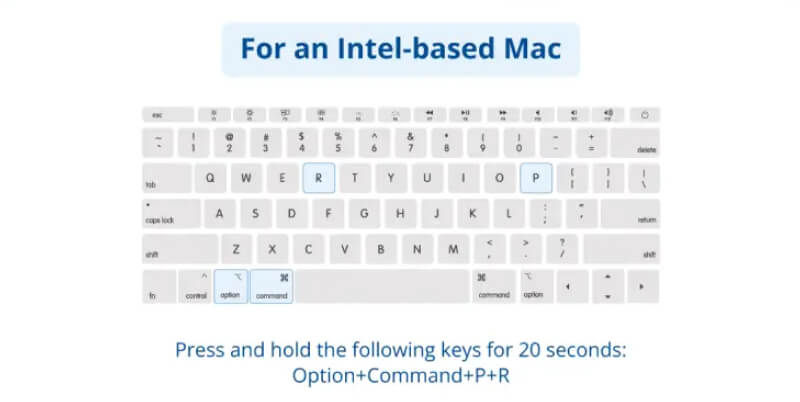
To reset NVRAM on an Intel-based MacBook:
- Shut down your MacBook.
- Start your MacBook.
- Press and hold Option + Command + R + P together immediately.
- Release the keys when you hear the startup chime again.
Default NVRAM settings might resolve the black screen on an Intel MacBook. If not, then continue to the next step.
6. Reset the SMC
Editor’s Note: Like NVRAM, MacBooks with Apple silicon do not have a dedicated SMC. The function is integrated into the M-series chip. A force restart will reset power delivery in most modern MacBooks.
The System Management Controller (SMC) in an older MacBook regulates the power supply and internal temperatures. The SMC could misreport the battery’s condition or cause it to reject a charge. As a result, the MacBook might not turn on even though it has the capacity to do so.
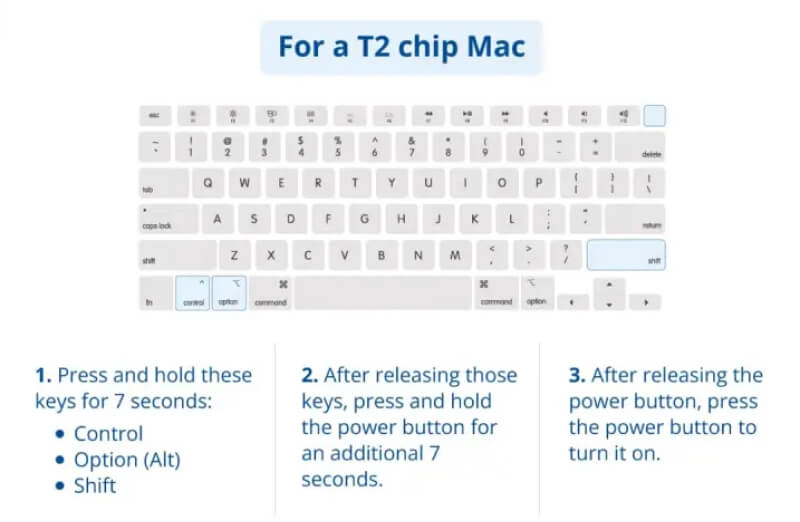
To reset the SMC on a MacBook with an Apple T2 Security Chip:
- Shut down your MacBook.
- Press and hold Left Option + Left Control + Right Shift together for 7 seconds.
- Press and hold the power button, along with the other three keys, for an additional 7 seconds.
- Release all four keys and wait a few seconds.
- Press the power button to start your MacBook.
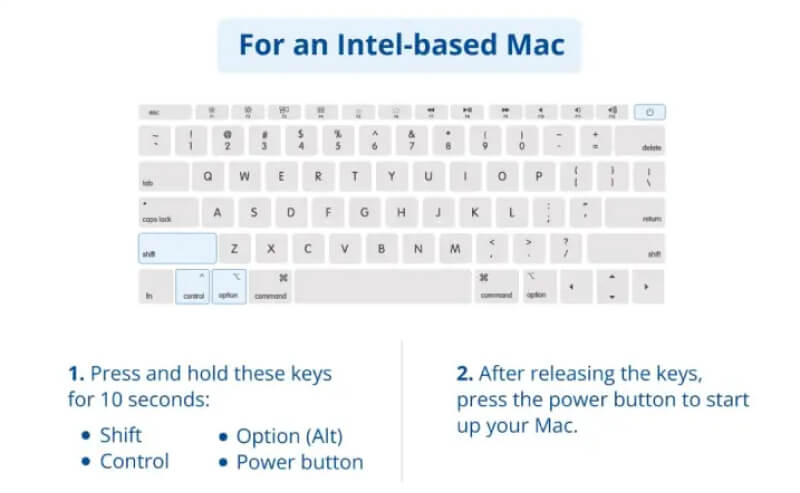
To reset the SMC on other Intel-based MacBooks:
- Shut down your MacBook and keep the power adapter connected.
- Press and hold Left Option + Left Control + Left Shift together.
- Press and hold the power button, along with the other three keys, for about 10 seconds.
- Release all four keys.
- Press the power button to start your MacBook.
Returning the system to its power management defaults could fix the issue.
7. Boot Into macOS Safe Mode
Safe Mode turns off all extra startup items and loads a lightweight version of macOS.
To boot into macOS Safe Mode on MacBooks with Apple silicon:
- Shut down your MacBook.
- Press and hold the power button until Loading startup options… appears.
- Click the Macintosh HD icon.
- Press and hold the Shift key.
- Select Continue in Safe Mode.
To boot into macOS Safe Mode on an Intel MacBook:
- Restart your MacBook.
- Press and hold the Shift key until the login screen appears.
- Log in to your MacBook.
You should see a Safe Boot label in the menu bar.
If the MacBook’s display works normally in Safe Mode, then a third-party app is the most likely cause.
8. Run Disk Utility
Editor Note: Running Disk Utility checks the file system’s integrity. In theory, it could find and repair file corruption to fix a black screen on a MacBook. However, the built-in tool could also lead to further corruption. In addition, newer macOS releases have System Integrity Protection (SIP). This feature prevents Disk Utility from modifying protected parts of the system. If the issue resides there, a scan will not resolve it. Assess the personal risks and rewards before running Disk Utility.
Using an external monitor to run Disk Utility can address corrupted files or permissions that might interfere with default display settings.
To run Disk Utility in macOS Recovery on a MacBook with Apple silicon:
- Shut down your MacBook.
- Press and hold the power button until Loading startup options… appears.
- Select the Options icon, then click Continue.
- Select your Apple account and enter your MacBook’s password if prompted, then click Continue.
- Choose Disk Utility from the list, then click Continue.
- Open View in the menu bar, then choose Show All Devices.
- Select the storage device from the sidebar, starting with APPLE SSD.
- Click the First Aid icon at the top of the screen, then Run.
- Wait for the process to complete.
- Run First Aid again on Macintosh HD and Macintosh HD - Data if needed.
To run Disk Utility in macOS Recovery on a MacBook with Intel chips:
- Shut down your MacBook.
- Press Command + R together immediately after it powers down.
- Hold those keys until the Apple logo appears, then release.
- Select your Apple account and enter your MacBook’s password if prompted, then click Continue.
- Choose Disk Utility in the macOS Recovery menu.
- Expand View in the menu bar, then select Show All Devices.
- Choose APPLE SSD from the top of the sidebar.
- Click the First Aid icon in the menu bar.
- Wait for the utility to finish.
- Repeat First Aid scans on Macintosh HD and Macintosh HD - Data if needed.
If the MacBook’s screen is still black, then there is one last option to try.
Editor’s Note: It is also possible to connect the MacBook to another Mac with a Thunderbolt cable. From there, the healthy Mac can run the tool on the affected MacBook’s volumes with Target Disk Mode (TDM).
9. Reinstall macOS with Recovery Mode
Editor’s Note: Installing a fresh copy of macOS preserves user data in most instances. Still, macOS Recovery could wipe data in edge cases, so proceed with caution.
macOS Recovery is a standalone mode to diagnose and resolve common issues on MacBooks. Reinstalling macOS is one of its basic, useful functions.
This process intends to replace system files and frameworks with default copies. By design, it does not remove local data, but losing files could still happen. Having a Time Machine backup or using Target Disk Mode to duplicate important data is advised.
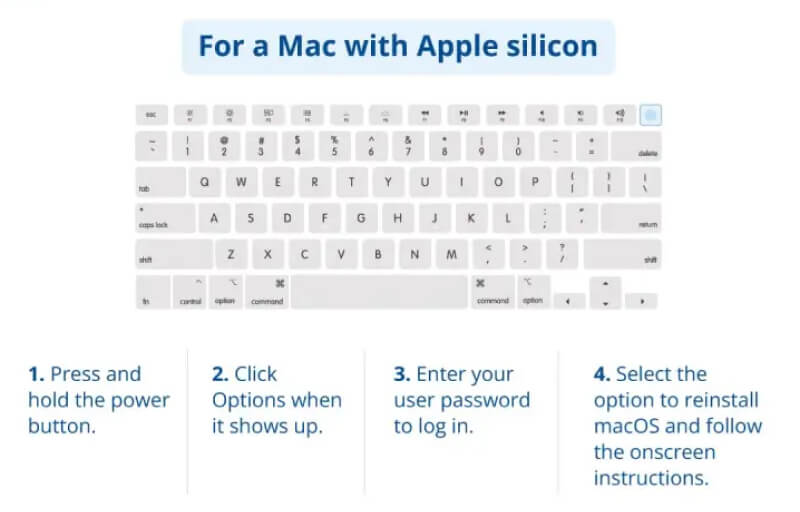
To reinstall macOS in Recovery Mode on a MacBook with Apple silicon:
- Shut down your MacBook.
- Press and hold the power button until Loading startup options… appears.
- Click Options, then the Continue button below the icon.
- Select your Apple account and enter your MacBook password if prompted, then click Continue.
- Select Reinstall macOS in the menu, then click Continue.
The process will install the latest version of your most recent macOS. Your MacBook might restart several times during the installation. Give it time to complete.
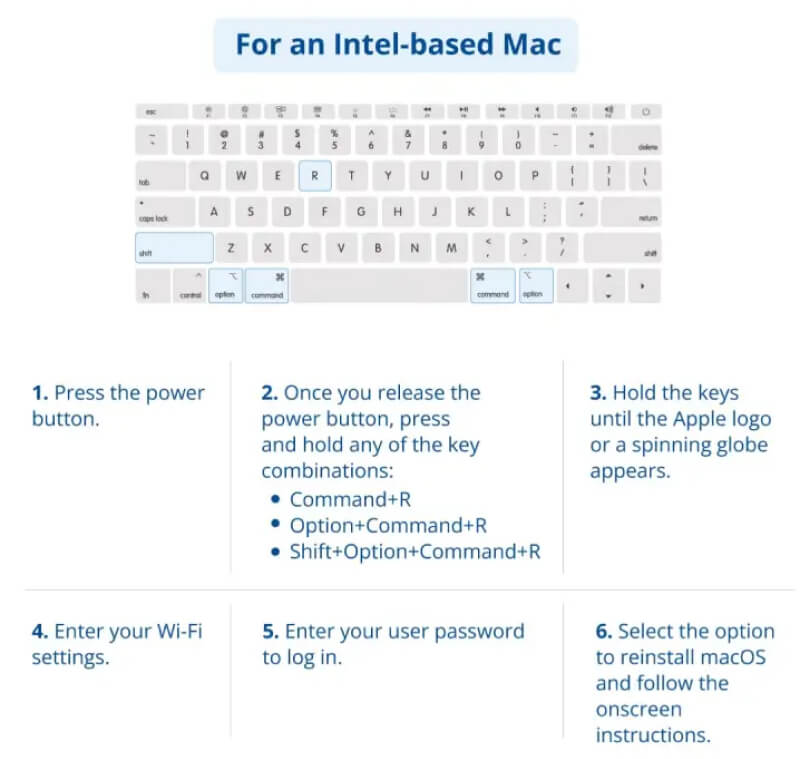
To reinstall macOS on an Intel-based MacBook:
- Shut down your MacBook.
- Press Command + R together immediately after it powers down.
- Hold those keys until the Apple logo appears, then release.
- Select your Apple account and enter your MacBook’s password if prompted, then click Continue.
- Choose Reinstall macOS from the list, then click Continue.
This method installs the current release of the laptop’s most recent macOS version.
If the black screen persists, then the problem is almost certainly tied to the MacBook’s hardware.
Editor’s Note: If you upgraded macOS before using Disk Utility, then it might install a previous version.
Troubleshooting Steps To Best Avoid
Not all fixes are safe to perform at home. They often demand technical expertise or specialized tools for a successful outcome. DIY repairs should end when the risks to yourself and the device outweigh the hassle of a black screen.
Some steps to avoid while troubleshooting your MacBook’s black screen:
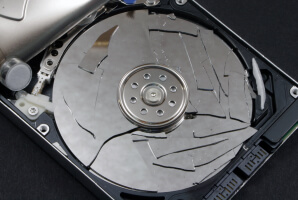
- Do not open the MacBook chassis to reseat the display cables. It will void your warranty and jeopardize the fragile ribbon cables.
- Do not run software on a MacBook that could have physical damage. The attempts frequently accelerate hardware failure.
- Do not flash the MacBook’s firmware yourself. Doing so could brick the laptop.
- Do not run Apple Diagnostics. Without a display, you will not be able to read the diagnostic codes. VoiceOver is not available in macOS’s pre-boot modes.
In these cases, a professional data recovery service is the best chance to retrieve files stored on the MacBook.
MacBook Black Screen on Startup vs. Running
When exactly the MacBook screen goes black is informative. Knowing which failure scenario you’re dealing with can save plenty of time.
Listen for sounds when you press the power button. Silence suggests a more serious hardware issue. A startup chime or a spinning fan confirms that the MacBook is attempting to boot. Even brief displays of activity can help determine the cause of the black screen. For example, a flickering Apple logo or cursor indicates that the hardware is intact.
MacBook Black Screen on Startup
Check if the MacBook shows any activity when it receives power. These signs could be a charging light, chime sound, or flashing display. If nothing happens, then the problem most likely resides in the boot process.
Possible causes for a black screen on startup include:
- Corrupted macOS installation
- Cable issue prevents signal transmission
- Incorrect NVRAM or SMC values
- Failing storage device
MacBook Screen Goes Black but Still Running
A black screen that occurs while the MacBook is still running indicates a different problem. A MacBook in this state has already loaded macOS, but something else disrupted the display output. Note what you were doing before the screen went black. A black screen triggered by a recently opened app or connected device is different from a random display loss.
Here are reasons why MacBook screens go black while still running:
- Failed update or crash of macOS
- Software conflict between a third-party app and the system
- External device reroutes the display signal
- Protective shutdown due to overheating
Why It Matters For Your Data
Each invasive or repeated step could compound the MacBook’s problems. Sometimes, the safest path is to minimize the damage and seek expert assistance before it gets much worse.
Our data recovery services come with free diagnostics and quotes for complete peace of mind.
Tips To Prevent a Black Screen on MacBook
The following checklist could help avoid MacBook black screens in the future:
- Keep macOS and all third-party software up to date.
- Avoid sudden shutdowns unless necessary.
- Clear the MacBook’s vents regularly.
- Monitor temperatures for extreme heat.
- Handle the MacBook carefully.
When To Contact Apple Support
Once all DIY fixes have been exhausted, it’s time to contact the experts.
Apple Support for Mac outlines service options and possible repairs. It also discloses coverage status for limited warranties and AppleCare plans.
You can visit an Apple Store near you for in-person guidance.
tor’s Note: The Genius Bar at an Apple Store will not provide laptop data recovery on a dead MacBook. You will need a specialist to retrieve your important files before erasing the device.
Recover Data From MacBook With Black Screen
Secure Data Recovery employs Apple Certified Mac Technicians to restore files regardless of storage device, chipset, or macOS version. Plus, as a member of the Apple Authorized Service Provider program, our reliable services will not void your warranty.
Trust the Mac recovery service with a track record of results, strong privacy policies, and a streamlined, risk-free process. Standard service includes a No Data, No Recovery Fee.
Call 800-388-1266, find a location, or fill out our form to get a free quote and reclaim what matters most.

Timothy Burlee

Timothy Burlee is a content writer for Secure Data Recovery Services. He specializes in various topics in the data industry, including data recovery technology, storage devices, and digital forensics. Throughout his career, he has covered complex concepts and provided accessible solutions for users. Before joining Secure Data, he worked as a freelance technical writer.