When you turn on your Mac, the last thing you want to see is a flashing folder with a question mark on your startup screen.
This error indicates that your computer can't locate or access the startup disk — the part that contains MacOS, the operating system, an essential component your Mac needs to access to boot up properly. The “folder of death” can appear for various reasons, including hard drive malfunctions, software corruption, or incorrect startup disk settings.
Don't panic. This guide will walk you through potential solutions to get your Mac up and running again. While some fixes are relatively straightforward, others may require more advanced troubleshooting or professional assistance.
The first thing you should do, if possible, is back up your files. And if you’re worried about potential data loss, contact us to help diagnose your issue and offer our hard drive recovery service expertise.
Solutions If Your Mac Starts Up with a Question Mark But Continues to Boot
If your Mac computer displays a flashing folder with a question mark for a brief moment before booting up, don't panic. This brief, blinking folder often indicates a temporary hiccup rather than a serious issue.
These first two easy troubleshooting methods might be enough to set things right. But if they don’t solve the problem, there are some advanced options to try — more on that later.
1. Check that the correct startup disk is selected
Your startup disk is where the Mac operating system — the basic software your Mac needs to function — resides. If the wrong disk is selected or there's an issue with the current one, you might encounter the dreaded question mark folder.
To check and change the startup disk:
- Go to the Apple menu in the top-left corner of your screen.
- Select System Settings.
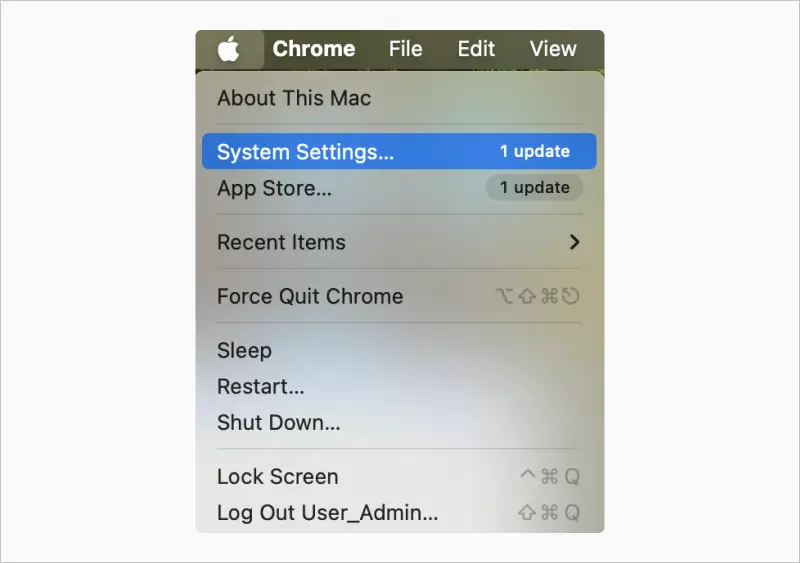
- Click on General, then select Startup Disk.
- Choose the desired startup disk (typically Macintosh HD).
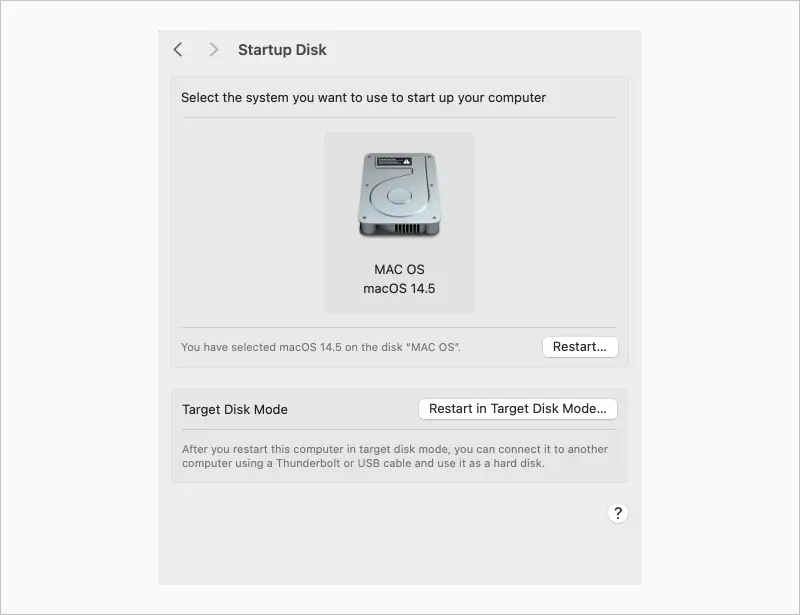
- Restart your Mac for the changes to take effect.
If you're using a network startup disk, ensure it's a standard network disk and not a network install image — the latter might erase your disk. You can tell the two apart by their icon. To find the standard network disk, look for a globe with a folder, not a globe with a green arrow pointing down.
2. Reset PRAM or NVRAM
PRAM (Parameter RAM) and NVRAM (Non-Volatile Random-Access Memory) store specific settings like speaker volume, display resolution, startup disk selection, and recent time zone information. NVRAM is specific to newer Mac models; older models will have PRAM. Resetting these can resolve certain startup issues. Note that if you reset NVRAM or PRAM, you’ll restore default settings for these preferences.
To reset PRAM or NVRAM:
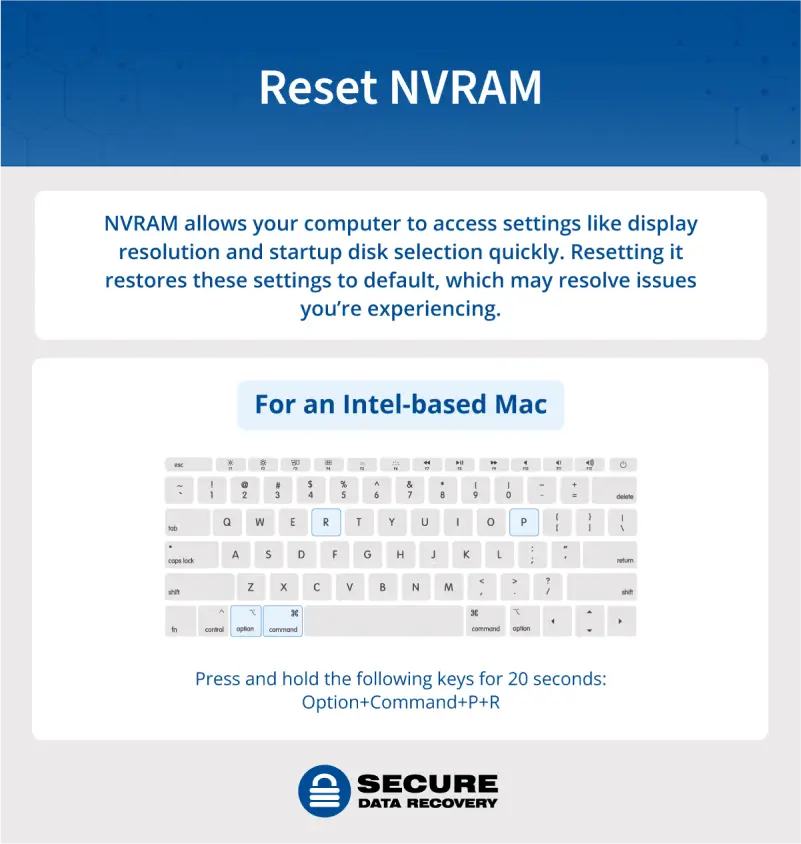
- First, shut down your Mac.
- Next, after your Mac is turned on, immediately you need to hold down the following keys: Option, Command, P, and R.
- Release the keys when you hear the startup sound twice (or the Apple logo appears and disappears twice on newer Macs). This should take about 20 seconds.
While it’s generally safe, resetting PRAM or NVRAM can restore default settings for various preferences. If you need to adjust settings, you can do so in System Preferences.
Solutions If Mac Shows Flashing Question Mark Folder and Won’t Start Up
If the flashing question mark folder is persistent, preventing your Mac from starting up, it likely indicates a more serious issue with your hard drive or operating system.
While some users with technical expertise can attempt the following solutions, it's essential to back up your data beforehand, as some of these steps may potentially result in data loss. If you're unsure or uncomfortable, don’t play with fire — reach out to us to help diagnose the issue and recover your data.
3. Repair the Startup Disk Using Disk Utility
Disk Utility, a built-in tool that manages internal and external, can help diagnose and repair disk errors when you run First Aid, which you perform through macOS Recovery Mode.
To access Disk Utility:
- Restart your Mac to enter Recovery Mode.
- For Intel-based Macs, restart while holding down the Command + R keys.
- For Apple Silicon, keep holding the power button until you see the Mac startup options window. From there, click Options and then click Continue.
- Release the keys when you see the Apple logo or a spinning globe.
- Enter your login information and connect to Wi-Fi if prompted.
- Choose Disk Utility from the Utilities window.
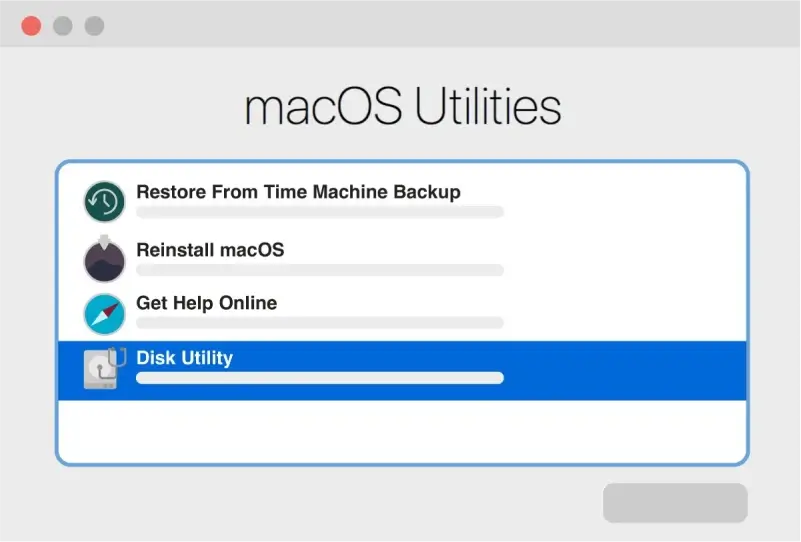
Once you’re in Disk Utility:
- Select your startup disk from the sidebar.
- Click the First Aid button to check for and repair disk errors. Repeat this for any disk, container, or volume you want to repair, if it can be selected.
- If Disk Utility finds and repairs issues, restart your Mac.
If Disk Utility can't repair the disk or identifies serious problems, you should stop, back up your data, and seek professional assistance. It’s always a good idea in general to back up any important data before running Disk Utility.
If Disk Utility is unable to read your disk, it also won’t be able to read any containers or volumes on your disk. If you run into that:
- Try shutting down your Mac and then unplugging all the nonessential devices you have connected to it.
- If this involves an external hard drive or SSD, ensure the cable connecting it to your Mac is the right one and that it’s functioning properly. Then, shut off and restart the drive.
If you take these steps and still don’t find your disk in Disk Utility, your Mac might need service.
4. Reinstall MacOS
If the previous steps haven't resolved the issue, reinstalling macOS might be necessary. This process typically preserves your personal data, as long as you reinstall using Recovery mode and don’t erase the disk beforehand. Regardless, it’s still a good idea to back up your data just in case.
To reinstall macOS:
- Restart your Mac while holding down Command + R to enter macOS Recovery.
- Select "Reinstall macOS" from the Utilities window.
- Follow the on-screen instructions to complete the installation.
- If you need to unlock your disk, enter the password you use to log in.
- If you’re prompted to choose between “Macintosh HD” and “Macintosh HD - Data,” pick “Macintosh HD.”
- If the installer doesn’t see your disk, you might have to erase it before proceeding with the reinstall.
Don’t let your Mac go to sleep or close its lid during the process. If you see a setup assistant after the installation is complete, follow the steps in the assistant.
If the installation fails or you encounter unexpected issues, you could create a bootable installer on an external drive, like a USB or Thunderbolt drive, to retry the process. Remember, always back up your data before proceeding with any reinstallation.
If reinstalling macOS doesn't resolve the problem, you’re likely dealing with a hardware issue that needs professional attention.
5. Format the Disk Using Disk Utility (Data Loss Risk)
If the previous steps couldn't repair your disk, you may need to reformat your disk and reinstall macOS. But fair warning: reformatting your disk makes data recovery much more difficult and erases the existing file system. Ensure you have a complete backup before proceeding. If you want to be on the safe side, reach out to a professional data recovery service, like Secure Data Recovery, instead.
To erase the disk:
- In Disk Utility, select the disk you want to erase.
- Click the Erase or Erase Volume button (depending on your macOS version).
- Choose the appropriate format (usually macOS Extended (Journaled)) and enter a name for the volume.
- Click the Erase button to proceed.
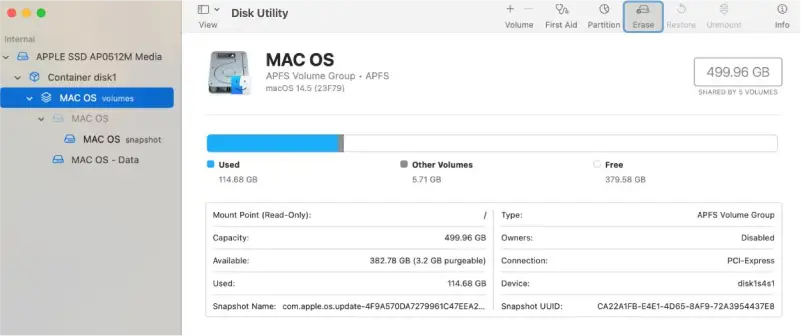
For Macs with macOS Monterey or later and equipped with an Apple silicon chip or T2 Security Chip, consider using the Erase All Content and Settings option in System Preferences for a potentially faster and safer erase process.
Remember, erasing your disk is a drastic step and will result in permanent data loss. If you have any doubts or reservations, we’re here to help.
What to Do If Your Mac Won’t Boot into Recovery Mode
For these troubleshooting methods to work, your Mac needs to be in macOS Recovery. If you're unable to boot your Mac into Recovery Mode, try these alternatives:
- Restart and hold Command-R: Immediately after turning on your Mac, press and hold Command-R to start up from the built-in recovery system.
- Try different recovery options: If Command-R doesn't work, try Option-Command-R (recover from the internet) or Shift-Option-Command-R (recover the macOS version that came with your Mac).
Here’s how to make sure the issue isn’t your Wi-Fi:
- Ensure your Mac has an internet connection.
- Try a different Wi-Fi network or Ethernet connection.
- Wait and try again later, as temporary network issues might be preventing access.
If these methods fail, try creating a bootable installer on an external storage device. Just be aware that creating a bootable installer can be time-consuming and requires sufficient storage space on the external drive.
First, make sure the storage device is plugged into the correct port on your Mac.
- For Mac models with USB-C or Thunderbolt ports: Use any USB-C port except for the leftmost port on MacBook models or the rightmost port on iMac, Mac mini, and Mac Studio models.
- For Mac Pro models: Avoid the topmost (desktop enclosure) or frontmost (rack enclosure) USB-C port.
From there, use Disk Utility to format the device to APFS (recommended for macOS High Sierra or later) or Mac OS Extended (Journaled) format. Then, follow these steps to create the bootable installer:
- Download the macOS installer from the App Store or macOS Recovery.
- Select the external storage device as the installation destination.
- Follow the on-screen instructions to complete the installation.
Once the installation is finished, you can use this external drive as your startup disk by selecting it in Startup Disk preferences.
Turn to the Experts in Case of Data Loss
Seeing that flashing folder with a question mark can be really scary, especially when you have important files at stake. We’ve covered some common fixes, but if your Mac’s still acting up, it might be time to call in the pros.
Regular data backups can help you avoid the worst case scenario. But if disaster strikes, don’t panic. Secure Data Recovery has helped countless people get their data back. Our work is backed by our No Data, No Recovery Fee guarantee — you don’t pay unless we get your files back. So if you’re struggling, don’t hesitate. Reach out to us today about our hard drive recovery services.


