An I/O device error (Input/Output error) occurs when a storage device — such as a hard drive (HDD), solid-state drive (SSD), USB flash drive, SD card, or external hard drive — fails to read or write data correctly. This issue can arise due to hardware malfunctions, corrupted file systems, bad sectors, outdated drivers, or faulty connections, preventing the operating system from properly accessing the device.
I/O errors typically appear when a user attempts to open, transfer, or modify files on a storage medium. The error message can vary depending on the operating system, appearing in Windows, Mac, or Linux, with a message like, “The request could not be performed because of an I/O device error.” Regardless of the phrasing, an I/O error often indicates a deeper issue that, if left unresolved, can lead to corrupted data or permanent data loss.
This guide is designed primarily for Windows users, providing step-by-step troubleshooting methods to help identify and fix I/O errors. If the issue persists or if your drive exhibits signs of physical failure, Secure Data Recovery offers professional data recovery services to safely retrieve your files.
Causes And Symptoms Of I/O Device Errors
I/O device errors can stem from a variety of hardware and software issues, ranging from corrupted file systems and bad sectors to failing storage devices and faulty connections.
Users encountering an I/O error may see one of the following messages:
- The request could not be performed because of an I/O device error
- The disk is not accessible
- I/O error reading/writing the file system
These messages typically appear when trying to access, transfer, or format a storage device, indicating corrupt files, bad sectors, faulty connections, or hardware failure. Depending on the root cause, an I/O error can be a minor, fixable issue — or a warning sign of impending drive failure.
Understanding what causes these errors can help you determine the best troubleshooting steps and whether professional data recovery is necessary. Below, we organized the causes from least to most severe, and listed the common cause, symptoms, potential issue, and recommended fix to help you resolve the problem efficiently.
Loose or faulty USB/SATA connection
Symptom: External drive frequently disconnects, Windows fails to recognize it, or file transfers are slow. Your device has a physical connection issue that may be resolved by reseating cables or ports.
Recommended Solution: Check USB/SATA cables and try different ports or computers.
Software conflicts or third-party applications
Symptom: The drive does not show up, Windows cannot access the drive, or errors pop up after installing new software. Background applications or non-Microsoft services are interfering with drive functionality.
Recommended Solution: Perform a clean boot to rule out software conflicts.
Power failure or improper ejection
Symptom: Files are unreadable after a shutdown, external drives ask to be formatted, or the system cannot access stored data. Power loss interrupted read/write processes, causing corruption.
Recommended Solution: Run CHKDSK first. If that does not work, use Disk Management to reassign a drive letter, or seek data recovery services.
Outdated or corrupt device drivers
Symptom: The system fails to detect the drive, disconnects randomly, or shows an incorrect file system format. The OS is unable to properly communicate with the storage device.
Recommended Solution: Update or reinstall device drivers via Device Manager.
Incorrect transfer mode settings
Symptom: I/O errors happen when reading or writing files, your device exhibits slow performance, or the drive is not being recognized properly. The system may be using an incompatible transfer mode, which is causing communication errors.
Recommended Solution: Change IDE channel properties in Device Manager.
Malware infection
Symptom: Files disappear or become corrupted, the system crashes, or you notice unauthorized file modifications. Malicious software has altered or encrypted drive contents.
Recommended Solution: Scan for malware and recover affected files.
Corrupted file system or bad sectors
Symptom: Error messages occur during file operations, files fail to open, or system performance slows. The drive has logical corruption, making data inaccessible.
Recommended Solution: Run CHKDSK to scan and repair errors.
Firmware corruption or outdated firmware
Symptom: The drive is recognized but inaccessible, files appear corrupted, or system prompts to format the drive. The drive’s internal software is malfunctioning.
Recommended Solution: Check for firmware updates from the drive manufacturer’s website.
Physical damage to the storage device
Symptom: You hear clicking, buzzing, or beeping sounds, the drive is not detected, or the system freezes when accessing the drive. You have a mechanical failure requiring professional recovery.
Recommended Solution: Stop using the drive immediately and seek professional data recovery services.
If you suspect an I/O error due to any of these causes, it’s important to stop using the affected drive immediately. Continuing to read from or write to a failing storage device could worsen corruption, overwrite existing data, or lead to permanent data loss.
If the issue is caused by physical damage, firmware corruption, or complete drive failure, attempting DIY repairs may further compromise the device. In such cases, professional data recovery services — like those offered by Secure Data Recovery — are the safest and most reliable option for retrieving important files while preventing further damage.
How To Fix I/O Device Errors
Once you’ve identified a potential cause of your I/O error from the table above, you can either jump to the troubleshooting method that matches your issue or work through this list in order from the simplest to the most advanced fixes. If you’re unsure of the exact cause, it’s best to start with basic troubleshooting steps, like checking cable connections and updating drivers, before moving on to more complex solutions like running CHKDSK, adjusting BIOS settings, or using Diskpart.
If your drive exhibits physical failure symptoms — such as clicking noises, disappearing from the system, or frequent crashes — stop using it immediately. Further attempts to access the drive could worsen data corruption or make recovery impossible. In these cases, professional data recovery services are the safest option for retrieving your files.
Follow the step-by-step instructions below to fix your I/O error.
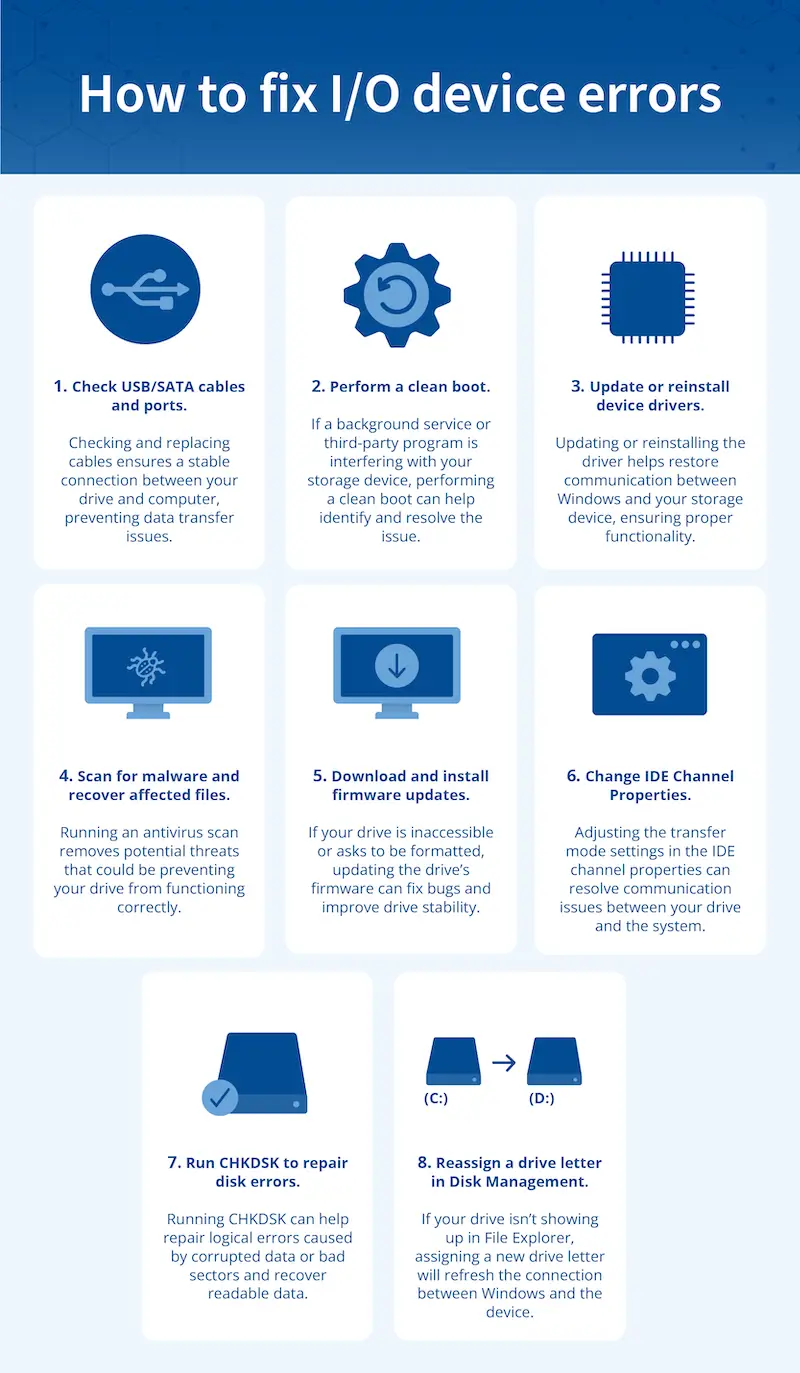
1. Check USB/SATA cables and ports
If your external hard drive frequently disconnects, operates slowly, or isn’t recognized by your computer, the issue may be a bad cable or faulty USB/SATA port. A weak or unstable connection can prevent your operating system from properly communicating with the storage device, leading to I/O errors and data transfer failures. Checking and replacing cables can help restore a stable connection and rule out physical connection issues before moving on to more advanced troubleshooting.
Steps to check connections:
- Unplug the drive from your computer.
- Plug it into a different USB port (try both front and back ports).
- Try using a different USB or SATA cable if you have one available. Faulty or aging cables can cause intermittent connection issues.
- Plug the drive into another computer to determine if the issue is with the drive itself or the original system.
- For internal hard drives, you may need to contact a professional to evaluate the issue and reseat the SATA and power cables, as improper connections can prevent the drive from being detected.
If this doesn’t work: A software conflict could be preventing Windows from recognizing the drive. Perform a clean boot (method 2) to rule out software conflicts.
2. Perform a clean boot
If a background service or third-party application is interfering with your storage device, performing a clean boot can help identify and resolve the issue. A clean boot starts Windows with only essential services and drivers, disabling unnecessary applications that may be conflicting with your storage device and causing I/O errors.
Steps to perform a clean boot:
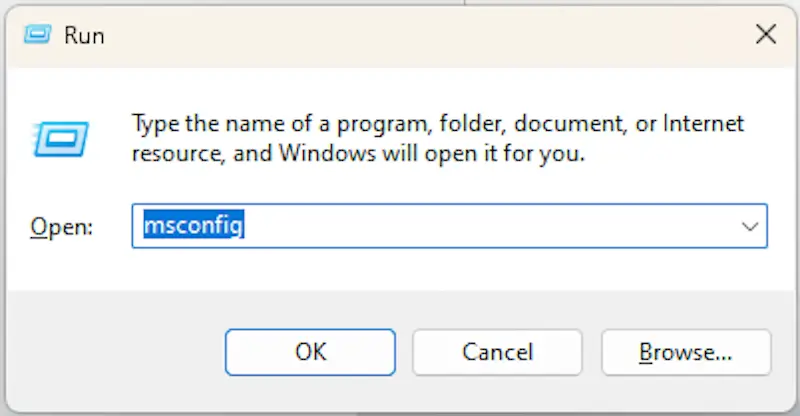
Press Windows + R, type msconfig, and press OK or Enter (depending on which Windows version you have).
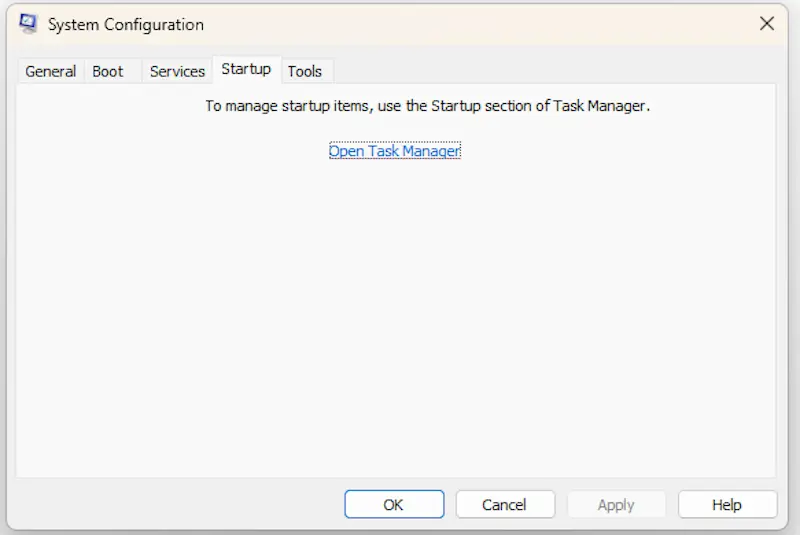
In the System Configuration window, go to the Services tab.
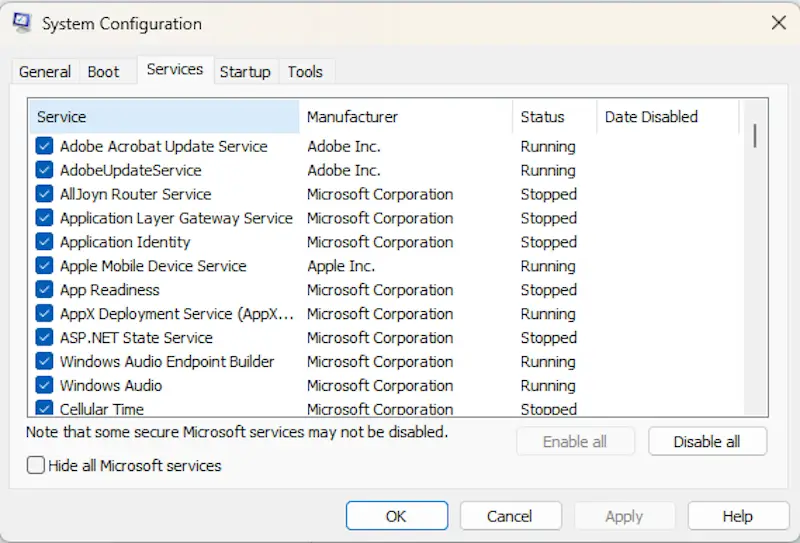
Check the box for Hide all Microsoft services, then click Disable all.
Next, go to the Startup tab and click Open Task Manager.
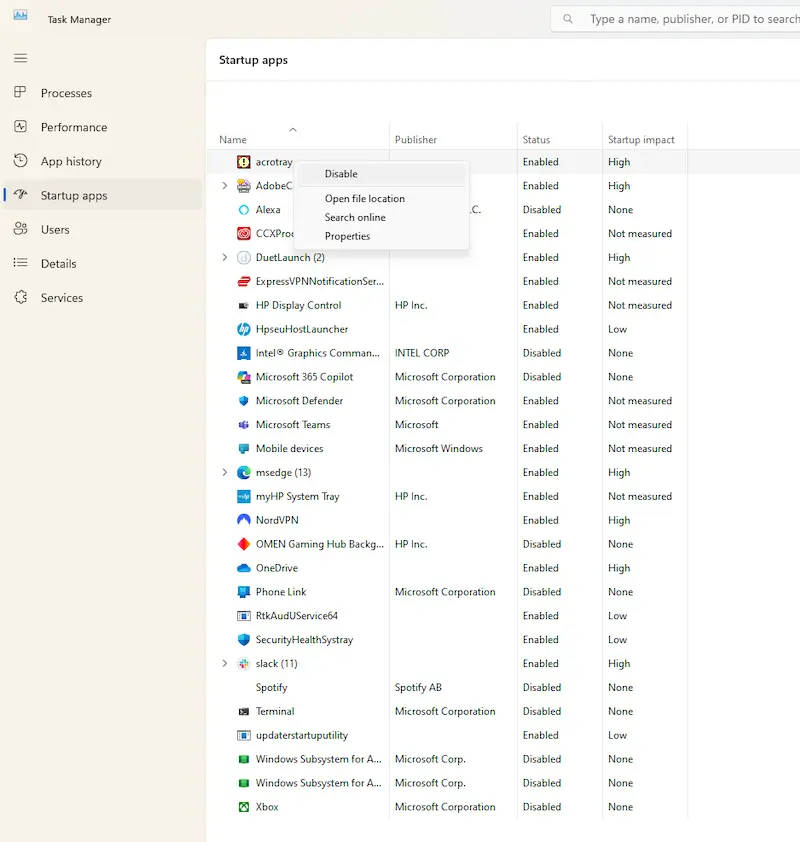
In Task Manager, disable all startup applications by right-clicking each one and selecting Disable. If you suspect a specific or new application is causing the issue, you can disable that and move to the next step. This will help you pinpoint which application caused the issue.
Close Task Manager and click OK in the System Configuration window.
Restart your computer and check if the I/O error is resolved.
If the error is gone, a third-party program was likely the issue.
Steps to re-enable services:
Once you’ve identified whether a background service was causing the issue, and resolved the issue with that service, you’ll want to restore your computer to its normal startup settings.
- Open System Configuration again following the steps above.
- On the General tab, select Normal Startup.
- Go to the Services tab, uncheck Hide all Microsoft services, then click Enable all and select Apply.
- Select the Startup tab, then click Open Task Manager.
- In Task Manager, re-enable all startup programs you had previously disabled. Click OK.
- When prompted, restart your computer to apply the changes.
If this doesn’t work, the issue may be related to outdated or corrupt drivers. Proceed to method 3 to try updating or reinstalling device drivers.
3. Update or reinstall device drivers
If your external or internal hard drive is not showing up, disconnects randomly, or is displaying an incorrect file system format, the issue may be due to a corrupt, outdated, or missing device driver. The driver acts as a bridge between Windows and your storage device — if it’s malfunctioning, Windows may be unable to recognize or communicate with the drive properly. Updating or reinstalling the driver can help restore normal functionality.
Steps to update/reinstall drivers:
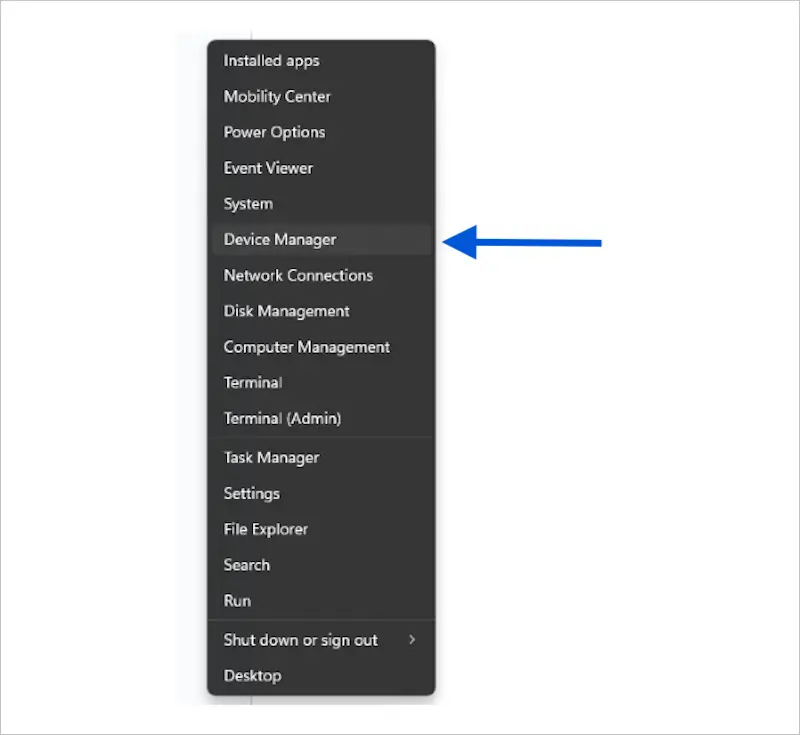
Press Windows + X on your keyboard and click Device Manager.
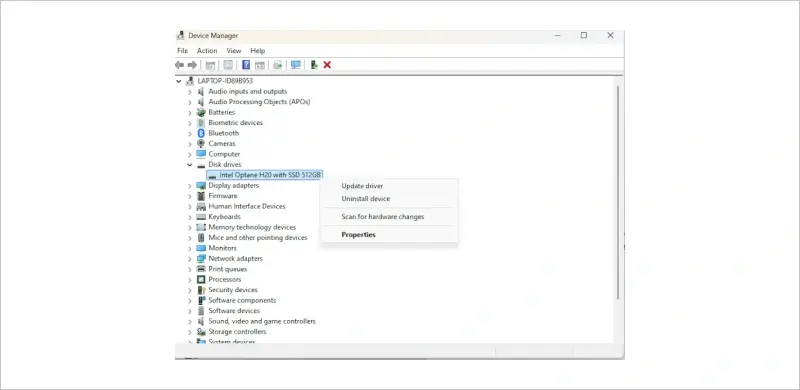
Click the arrow next to Disk Drives to expand the list.
Find the drive that’s causing the issue.
Right-click it and select Update Driver.
Choose Search automatically for drivers and wait for Windows to check for updates.
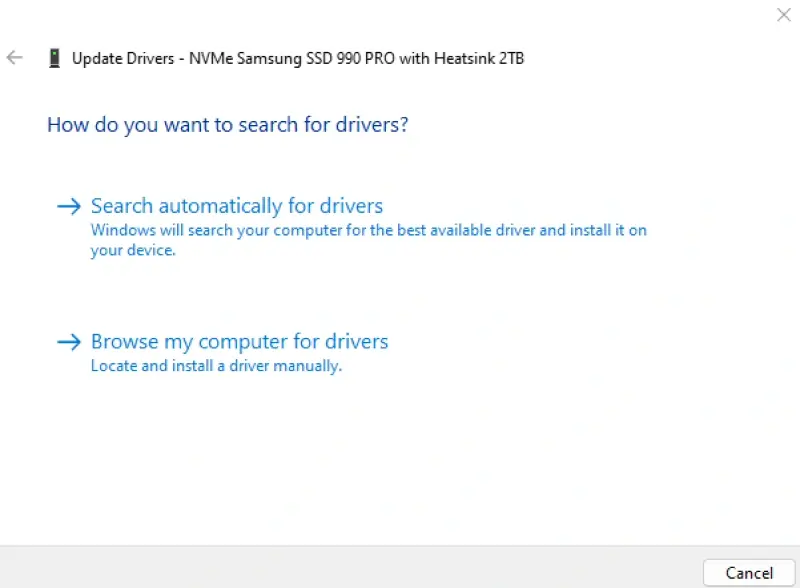
If Windows finds and installs an update, restart your computer and check if the error is resolved.
If this doesn’t work, try uninstalling the driver:
Right-click the same drive in Device Manager.
Click Uninstall Device > OK.
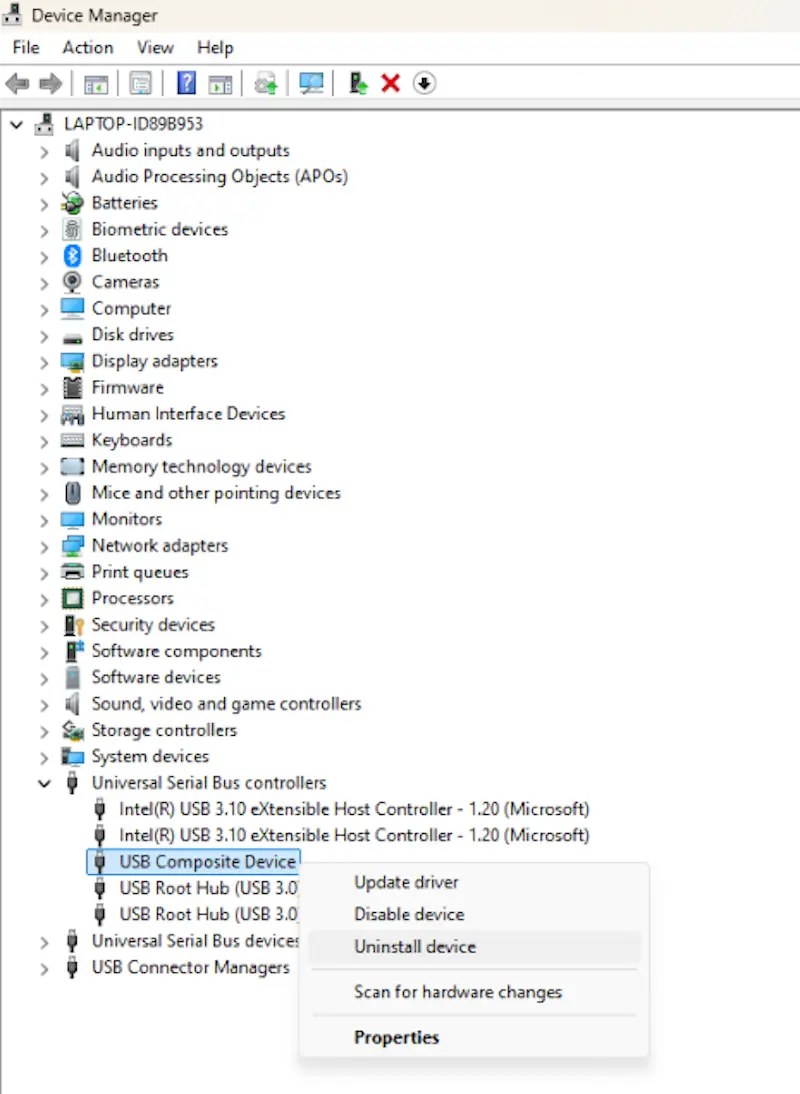
Restart your PC, and Windows will automatically reinstall the correct driver upon reboot.
If this doesn’t work, the issue may be due to a virus or malware infection affecting the drive’s functionality. Try running a malware scan (method 4) next.
4. Scan for malware and recover affected files
If your files are missing, corrupted, or your system is behaving strangely, malware could be interfering with your storage device. Some types of viruses can prevent the operating system from properly reading or writing data. Running a full antivirus scan helps detect and remove any threats that might be causing I/O errors and drive malfunctions.
Steps to remove malware:
Disconnect your external drive (if you’re using one) to prevent further infection.
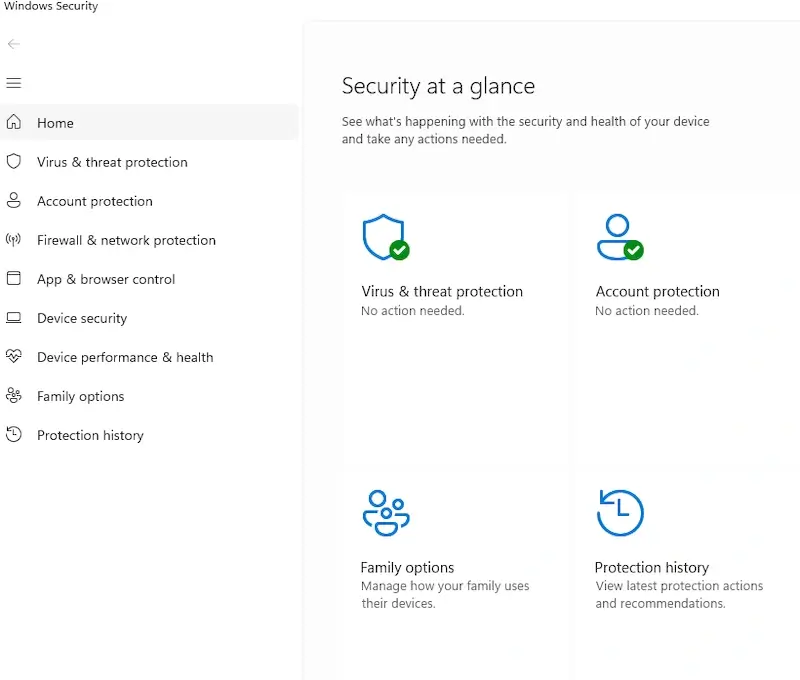
Open Windows Security (Press Windows + S, type Windows Security, and press Enter).
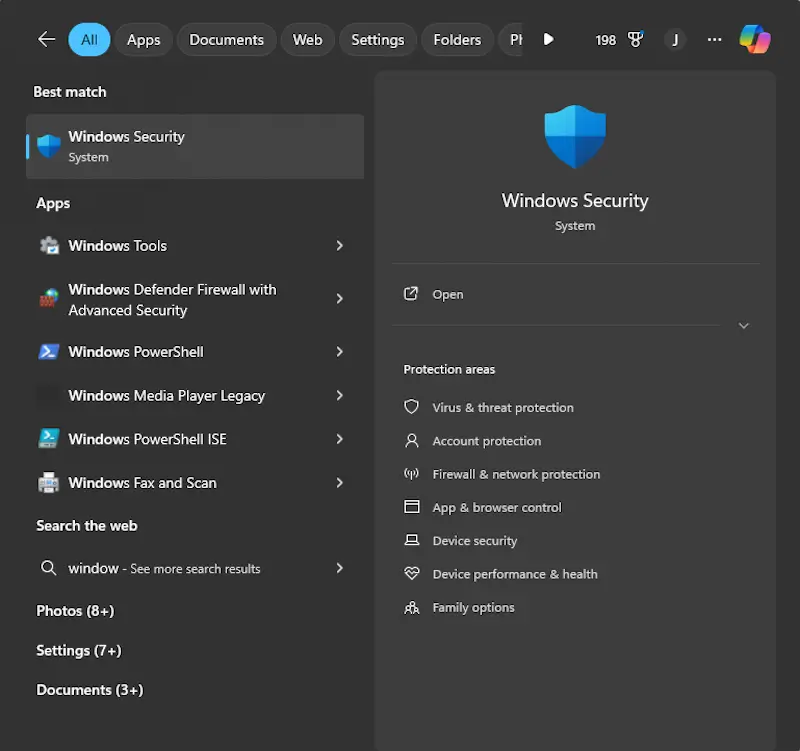
Click Virus & Threat Protection > Quick Scan.
If malware is found, promptly have it removed.
Restart your computer and reconnect your drive.
If the issue persists, the I/O error may be caused by firmware corruption or outdated firmware preventing the drive from functioning properly. Move onto method 5 to try installing firmware updates onto your drive.
5. Download and install firmware updates
If your drive is recognized but inaccessible, frequently disconnects, or prompts you to format it, outdated or corrupted firmware may be the cause. Firmware controls how your storage device communicates with your computer, and manufacturers release updates to fix bugs, improve stability, and enhance compatibility. Installing the latest firmware can resolve I/O errors and prevent further issues.
Steps to update firmware:
- Visit your drive manufacturer’s website (e.g., Seagate, WD, Samsung, etc).
- Search for firmware updates for your specific drive model.
- Download and install the update, carefully following the instructions provided by the manufacturer.
Warning: Improper firmware updates can make data recovery much more difficult or even render the drive unusable. If your data is important and you’re unsure about updating firmware, seek professional help first.
If this doesn’t work, the issue may be related to transfer mode settings causing communication problems between your drive and Windows. Next, try changing the IDE channel properties (method 6).
6. Change IDE Channel Properties
If your I/O device error persists, adjusting the transfer mode settings in the IDE channel properties within Device Manager may help resolve communication issues between your drive and the system. By default, Windows uses Direct Memory Access (DMA) mode, which allows data to be transferred directly between the storage device and the system’s memory without overloading the CPU. However, if DMA mode is causing errors, switching to Programmed Input/Output (PIO) mode may temporarily resolve the issue.
Important: PIO mode is significantly slower than DMA because it requires the CPU to handle all data transfers instead of offloading them to the drive controller. Due to the performance impact, this should only be used as a temporary fix to determine whether the transfer mode is the root cause of the I/O error.
Steps to change IDE channel properties:
Press Windows + X and select Device Manager.
Expand IDE ATA/ATAPI controllers to view the available channels.
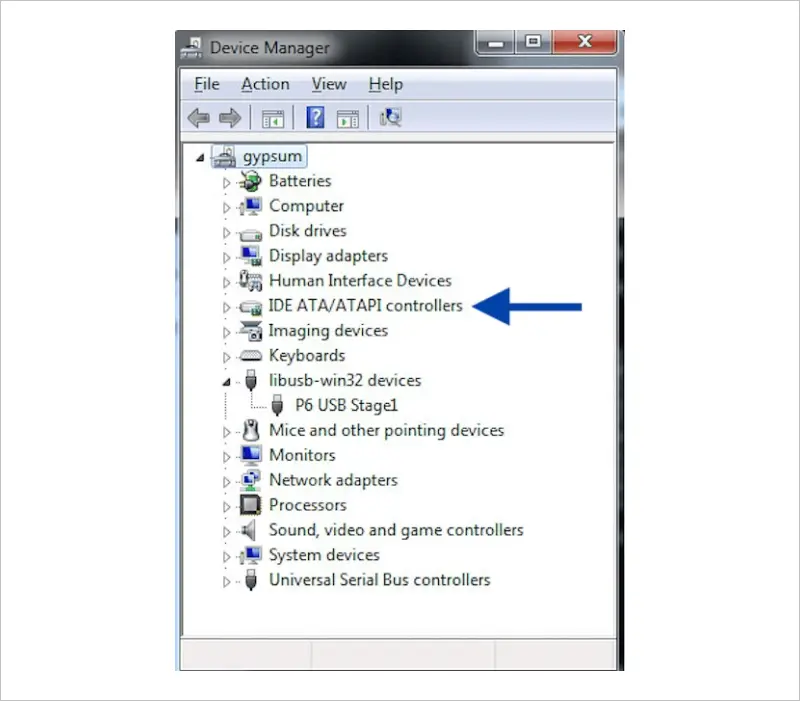
Right-click on the channel where the affected drive is connected (usually the Secondary IDE Channel) and select Properties.
Click on the Advanced Settings tab.
In the Transfer Mode dropdown for the corresponding device (usually Device 0), select PIO Only.
Click OK and close all windows.
Restart your computer and test the drive to see if the error has been resolved.
If switching to PIO mode resolves the issue:
- This confirms that DMA mode is causing the I/O error, but since PIO mode results in much slower performance, you’ll want to try switching back to DMA mode to see if the issue reoccurs.
- If Windows automatically switches back to DMA and the error returns, the drive may have bad sectors or hardware issues, requiring further troubleshooting.
- If bad sectors are suspected, try running CHKDSK (method 7).
- If you suspect hardware issues, you may need to have the device professionally repaired.
If this method did not resolve the issue, the I/O error may be caused by corrupted files or bad sectors. Run CHKDSK (method 7) to scan and repair file system errors.
7. Run CHKDSK to repair disk errors
If you’re experiencing I/O error messages, slow performance, or files that fail to open, your hard drive may have corrupted data or bad sectors. These issues can develop due to power failures, improper ejection of external drives, or aging storage devices, preventing Windows from properly reading and writing data.
Running CHKDSK (Check Disk) scans your drive for logical errors and attempts to repair damaged sectors, helping to recover readable data and improve drive stability. It is a good option for minor errors, but if you suspect hard drive corruption or failure, consult a professional. Running CHKDSK in these scenarios can make data recovery more difficult.
Important notes about CHKDSK:
- This process can take several hours on large drives, so be patient.
- If CHKDSK detects bad sectors, it will attempt to move data to a healthy part of the drive, but some files may still be lost.
- If CHKDSK freezes, fails, or gets stuck for an extended period, stop immediately and seek professional data recovery services to prevent further data loss.
Steps to run CHKDSK:
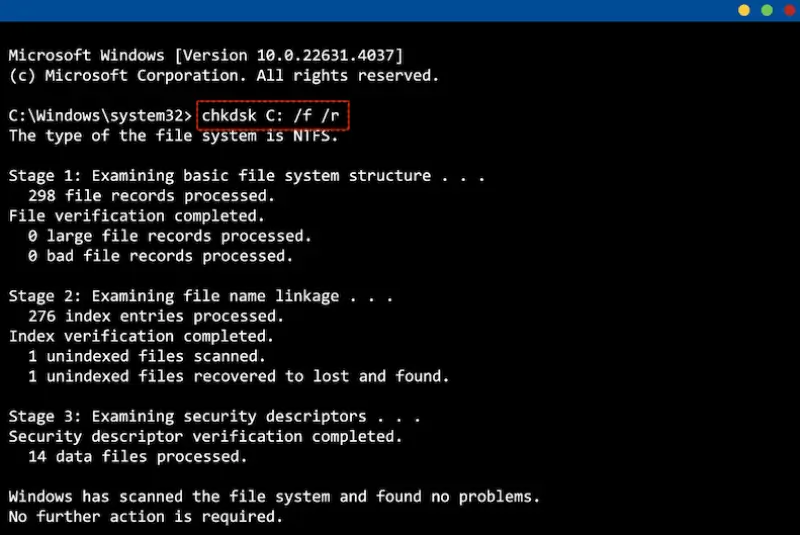
Press Windows + X and select Command Prompt (Admin).
Type the following command:
chkdsk X: /f /r /x
*(Replace X with your drive letter. Example: If your external drive is C:, type chkdsk C: /f /r /x)
Press Enter and wait for the scan to finish.
If this doesn’t work, the issue may be related to drive letter conflicts or incorrect partition settings. Proceed to method 8 to try reassigning a drive letter.
8. Reassign a drive letter in Disk Management
If your storage device isn’t showing up in File Explorer, it may simply need a new drive letter. Assigning a new letter forces Windows to refresh its connection to the device, making it accessible again.
Important warning before changing a drive letter:
- If applications or programs are installed on the drive, changing the letter may cause them to stop working or become inaccessible.
- You may need to manually update file paths or reconfigure affected software to reflect the new drive letter.
- If this drive is used for system files or critical dependencies, avoid changing the letter unless absolutely necessary.
Steps to assign a new drive letter:
- Press Windows + X and select Disk Management.
- Find your drive (it may be labeled as RAW or Unallocated).
- Right-click the drive and select Change Drive Letter and Paths > Add.
- Choose an unused letter (like E: or F:), then click OK.
- Close Disk Management and check if the drive is now accessible.
If Disk Management doesn’t work, try Diskpart (Advanced Users Only):
If the drive still doesn’t appear or cannot be assigned a letter, you can use Diskpart, a command-line tool, to manually assign or clean the drive. However, certain Diskpart commands will erase all data permanently. If your data is important, stop here and seek professional data recovery before proceeding.
Steps to use Diskpart:
Press Windows + X and select Command Prompt (Admin).
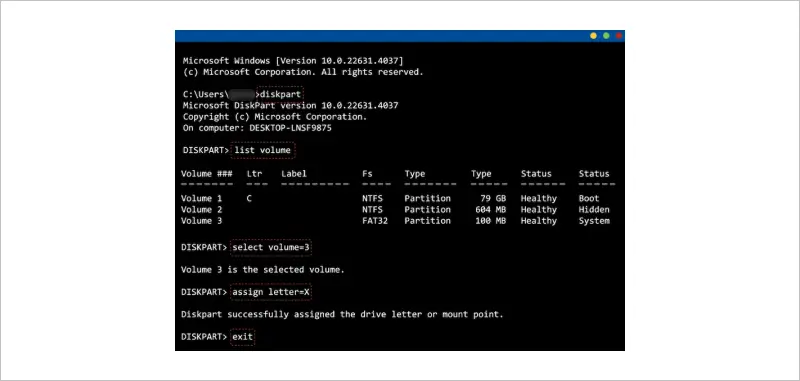
Type diskpart and press Enter.
Type list volume and press Enter (this will show the volumes for all connected drives).
Find the affected drive and type:
select volume=3
*(Replace 3 with the correct volume number associated with your disk.)
To assign a drive letter:
assign letter=X
*(Replace X with any unused letter.)
If the drive is corrupted and you don’t need the data, you can use the clean command to wipe and format it:
clean
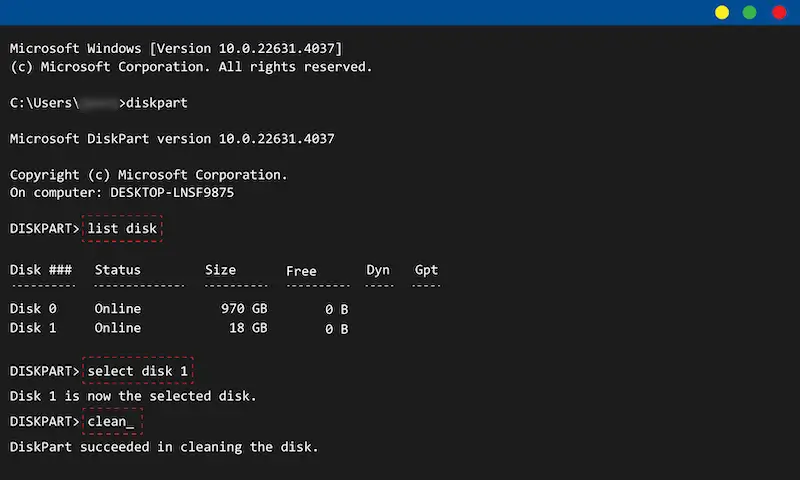
Warning: The clean command will completely erase all data on the drive. Ensure you have backed up important files before proceeding.
If you are unable to back up your data because the drive is inaccessible, contact Secure Data Recovery to safeguard your files before performing this step.
If this still doesn’t work, your drive may be failing or have physical damage. At this point, professional data recovery services are the only safe option for retrieving your files.
What To Do If The I/O Error Persists
If you’ve tried all the troubleshooting steps and the I/O error still remains, it’s time to assess whether your data is critical. If the drive contains important files, stop using it immediately to prevent further damage.
Certain signs indicate serious drive failure that cannot be resolved with DIY troubleshooting. Clicking, buzzing, or beeping noises indicate mechanical failure, while a drive that doesn’t appear in Disk Management or BIOS may have severe corruption or internal damage. Continued attempts to access or repair a failing drive could cause data corruption, overwrite existing files, or make recovery impossible.
At this stage, professional data recovery is your safest option. Secure Data Recovery specializes in retrieving files from physically damaged, corrupted, and unresponsive drives. Our certified engineers specialize in USB flash drive, external drive, and hard drive data recovery. We can safely restore your files without causing further damage.
How To Prevent I/O Errors In The Future
I/O errors can often be avoided with proper drive maintenance and safe data handling practices. By following these preventive measures, you can reduce the risk of data corruption, drive failure, and unexpected system errors, ensuring that your storage devices remain reliable and accessible.
1. Back up important data regularly
The best way to protect your files from I/O errors and drive failures is to back up your data consistently. Use an external hard disk or cloud storage to create duplicate copies of critical files. If your drive encounters an error, having a backup ensures you won’t lose important information.
2. Keep device drivers and firmware updated
Outdated or corrupt drivers can cause compatibility issues and I/O errors by preventing your system from properly communicating with the storage device. Regularly check for driver updates in Device Manager and visit the manufacturer’s website to install the latest firmware for your SSD or external hard drive. Firmware updates fix bugs, improve stability, and reduce the likelihood of drive errors.
3. Properly eject external drives
Removing an external hard drive or USB device without safely ejecting it can corrupt data and cause I/O errors. Always use the “Safely Remove Hardware” option in Windows before unplugging a device. This ensures that all read/write processes are completed, preventing file system errors and lost data.
4. Use high-quality cables and ports
Loose or faulty USB and SATA cables can cause intermittent connections, failed data transfers, and drive detection issues. Always use high-quality, durable cables to connect storage devices. If your drive frequently disconnects, try switching to a different USB or SATA port to rule out a port failure.
5. Scan for malware regularly
Malware can modify drive settings, corrupt system files, and interfere with data transfers, leading to I/O errors. Running routine antivirus scans with trusted security software helps detect and remove potential threats. Keeping your system malware-free helps ensure stable performance and prevents data loss.
6. Monitor drive health
Hard drives and SSDs naturally degrade over time, and bad sectors, overheating, or declining performance can indicate an impending failure. Use tools like SMART monitoring or manufacturer-provided diagnostic utilities to check for warning signs. If a drive shows signs of deterioration, replace it before it fails completely to prevent data loss.
Taking these preventive steps can significantly reduce the risk of I/O errors and keep your storage devices running smoothly. However, if you ever experience persistent drive issues or sudden data loss, Secure Data Recovery provides professional recovery services to help safely retrieve your files and restore access to your important data.
Stop An I/O Error Before It Leads To Data Loss
I/O errors can be frustrating, especially when they prevent access to important files. While many issues can be resolved through basic troubleshooting — such as updating drivers, checking connections, or running CHKDSK — persistent errors may indicate hardware failure, severe corruption, or physical damage. If your drive is making strange noises, isn’t recognized at all, or continues to show errors despite multiple fixes, stop using it immediately to prevent further damage and data loss.
For the best chance at recovering your files, Secure Data Recovery offers expert solutions for a variety of storage devices, including:
If you’re facing a critical data loss situation, don’t wait, contact Secure Data Recovery today to take the first step toward recovering your files safely and securely.

Yevgeniy Reznik

Yevgeniy Reznik is Laboratory Operations Manager at Secure Data Recovery Services in Cleveland, Ohio, and has more than a decade of experience as a data recovery engineer. He graduated from Cleveland State University with a degree in computer science and spent 15 years as an IT entrepreneur and small business owner before joining the company.