The iPhone Unavailable error is a frustrating scenario that occurs when the device becomes locked. In most cases, the iPhone will prompt users to try again later. However, there are some situations where further action is required, including a factory reset.
Secure Data Recovery is an Apple Authorized Service Provider (AASP) with advanced knowledge of iPhone models and iOS platforms. This guide to iPhone unavailable fixes outlines a simple, step-by-step approach to resolving the issue and restoring access to the device.
Key Takeaways:
- iPhone Unavailable is an error message that appears after repeatedly entering an incorrect passcode.
- Often, the device allows you to try again later. However, Apple designed the iPhone to permanently lock itself after 10 failed attempts.
- There are several methods to resume using the iPhone quickly.
- Enabling Face ID or Touch ID can prevent future lockouts due to incorrect passcodes.
What Does iPhone Unavailable Mean?
iPhone Unavailable is an error message that occurs when a user enters the incorrect passcode multiple times.
The iPhone becomes locked after three failed attempts. Apple enforces a short timeout before a fourth attempt. Users must wait for the time to expire before trying again. Subsequent failed attempts feature even longer timeouts.
Here are the wait times for entering incorrect passcodes:
- 4 attempts: Try again in 1 minute.
- 5 attempts: Try again in 5 minutes.
- 6 attempts: Try again in 15 minutes.
- 7 attempts: Try again in 1 hour.
- 8 attempts: Try again in 3 hours.
- 9 attempts: Try again in 8 hours.
Following the tenth unsuccessful attempt, the iPhone no longer displays a countdown. You cannot attempt to enter a passcode to unlock the iPhone. To regain access to the device, you will have to erase the iPhone’s contents and restore a backup or factory settings.
The design prevents unauthorized access due to loss or theft by safeguarding users against brute-force attacks. It also protects people who choose to sell or trade their iPhone without wiping it first.
Fortunately, there are a few ways to unlock the device.
iPhone Unavailable Fixes
The methods below outline how to fix iPhone Unavailable errors.
Note: After erasing the device, you will need to restore the iPhone from a backup to preserve user data. You must have already created a valid backup on iCloud, Finder, or iTunes. Data saved after the last successful backup will be lost. Generally, choose the most recent backup for best results.
Method 1: Erase iPhone from Lock Screen
Since iOS 15.2 (released in December 2021), users have been able to erase their iPhone from the lock screen. This convenient method removes the need for a computer to reset the device. The option shows up after a series of failed attempts. You will need your Apple ID and password to complete the process.
To erase your iPhone via the lock screen:
- Trigger the Erase iPhone option by entering several incorrect passcodes.
- Tap Erase iPhone to begin the reset.
- Enter your Apple ID credentials when prompted.
- Wait for the iPhone to restore its factory settings.
You can restore a backup once the iPhone’s welcome screen appears.
Method 2: Enter iPhone Recovery Mode
For older models, iPhone recovery mode is an alternative method to erase a device, but it requires a Mac or PC.
To restore your device using iPhone recovery mode:
- Connect the iPhone to the computer.
- Launch the latest version of Finder on macOS or iTunes on Windows.
- Enter iPhone recovery mode.
- iPhone 8s and newer models: Quickly press and release the Volume Up Button. Next, quickly press and release the Volume Down Button. Finish the process by pressing and holding the Side Button until you see the recovery mode screen.
- iPhone 7 and 7 Plus: Press and hold the Volume Down Button and Power Button together until you see the recovery mode screen.
- iPhone 6s and older models: Press and hold the Home Button and Power Button together until you see the recovery mode screen.
- Select Restore when prompted to reset the iPhone.
- Wait for the device to revert to its factory settings.
After resetting the iPhone, users can load an existing backup to restore their important data to the device.
Note: Not sure which iPhone you own? Identify your iPhone model with Apple Support.
Method 3: Use Find My iPhone on iCloud
A third method involves erasing the iPhone remotely via your iCloud account. It is useful if you cannot physically access the phone. You must have previously enabled Find My iPhone to employ this method.
To erase your device using Find My iPhone on iCloud:
Go to icloud.com and log in with your Apple ID.
Click the Find My icon in the menu.
Select the locked device from the list.
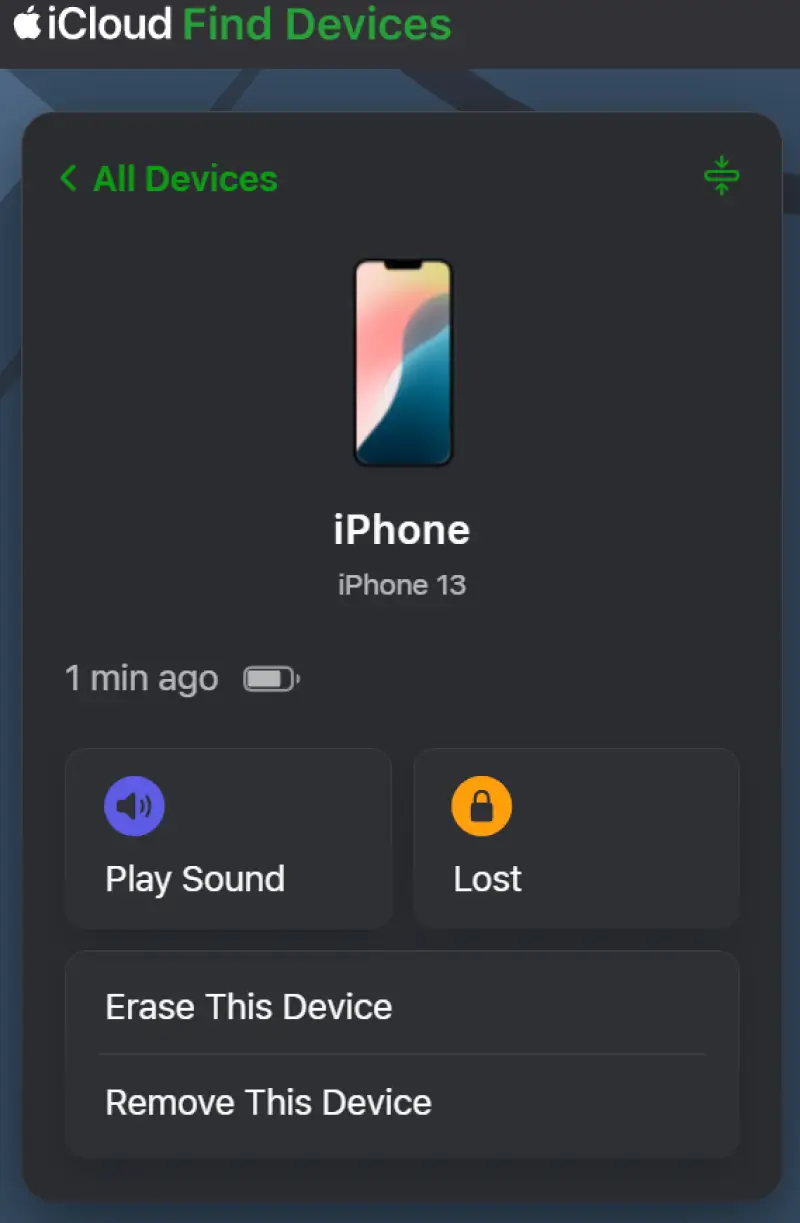
Choose Erase This Device.
Once erased, you can use your iPhone. Users have the option to restore an iCloud backup or set up the smartphone again.
Method 4: Contact Apple Support
Apple Support helps handle a range of iPhone issues, such as forgetting your passcode or dealing with a disabled iPhone.
If needed, you can visit an Apple Store for further assistance, including tools to reset the device.
Is iPhone Unavailable Permanent?
It depends.
If the lock screen shows a countdown, then the error is not permanent. However, you will need to erase the iPhone to use the device if it does not display a timeout.
You can still avoid data loss on a permanently locked iPhone by restoring an iCloud, Finder, or iTunes backup.
How To Prevent Future Lockouts
Face ID (introduced on iPhone X in 2017) or Touch ID (debuted on iPhone 5 in 2013) could prevent lockouts. You can also store your phone’s code in a secure password manager like iCloud Keychain or a physical safe to limit guesses.
To enable regular iCloud backups for your device in case of lockouts or loss:
Open the Settings app.
Select your Apple Account.
Tap iCloud.
Tap iCloud Backup.
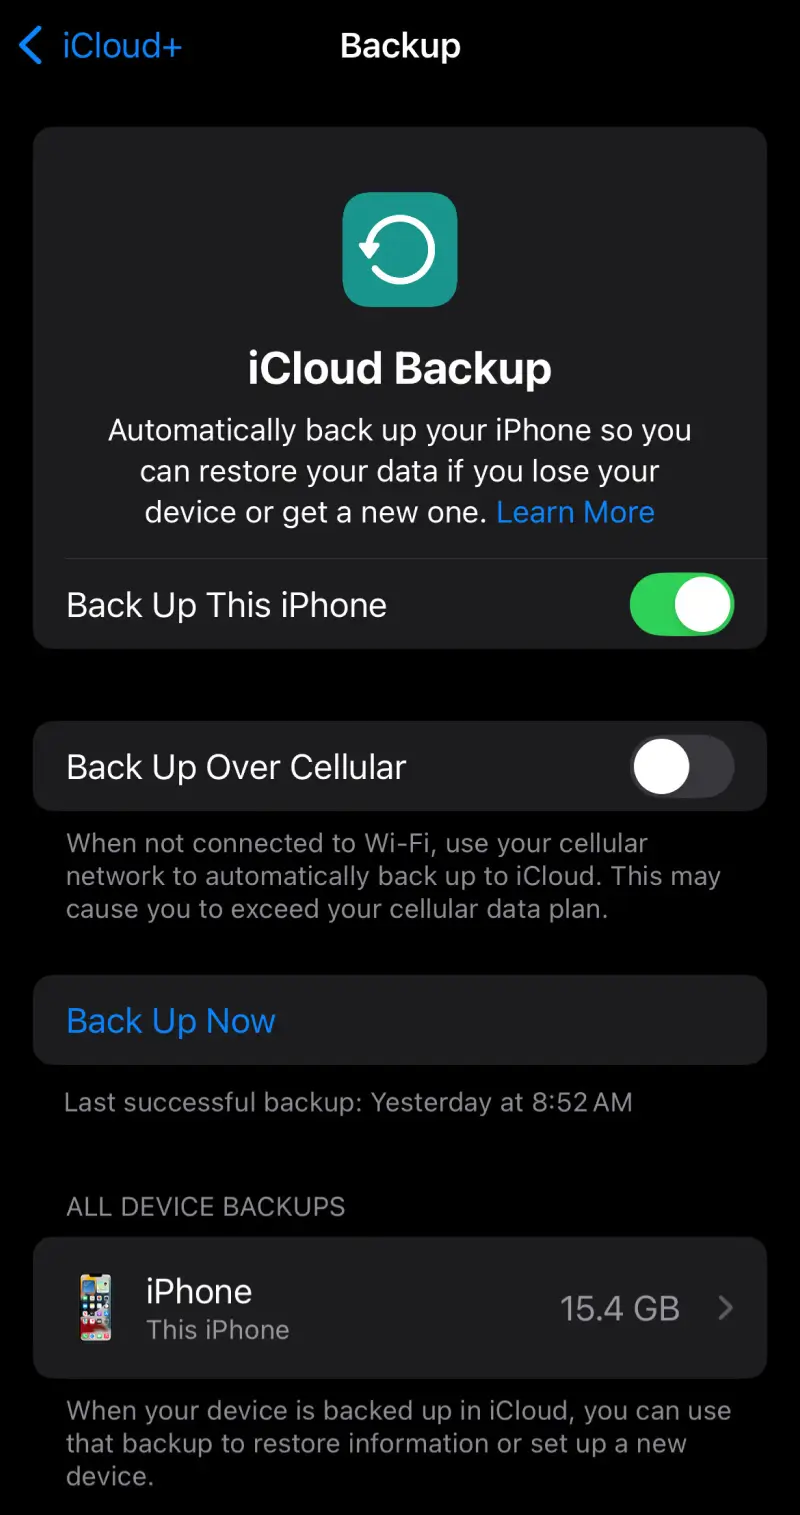
Toggle on Back Up This iPhone.
You can also choose the Back Up Now option to create a copy of your iPhone on demand.
Other Options When iPhone Says Unavailable
Sadly, an existing backup is the only option to recover data from a locked iPhone with the Secure Enclave feature. The modern hardware functions as a processor that isolates and protects sensitive data, such as passwords, encryption keys, or biometric info. Even if the iPhone is lost or the system is compromised.
However, our iPhone data recovery experts can restore files in many other cases.
Call us at 800-388-1266 or request help to receive a free quote and a No Data, No Recovery Fee guarantee.

Timothy Burlee

Timothy Burlee is a content writer for Secure Data Recovery Services. He specializes in various topics in the data industry, including data recovery technology, storage devices, and digital forensics. Throughout his career, he has covered complex concepts and provided accessible solutions for users. Before joining Secure Data, he worked as a freelance technical writer.